

A DIYer’s Guide to Brake Inspection
Part 2 – The Complete Brake Inspection
When you exit the freeway and apply the brakes, does your entire vehicle, brake pedal or steering wheel shake? Do you hear strange grinding or squealing noises as you come to a stop? When you apply the brakes, does your vehicle pull to one side – or even more terrifying – does the pedal almost goes to the floor? These are all signs that your brakes need IMMEDIATE repairs! Before your brakes get to this point, it’s a much safer, less expensive and time-saving practice to routinely perform brake inspections.
There are two basic types of inspections: a “Quick Inspection” that only takes a few minutes and a “Complete Brake Inspection”, which requires removing the wheels. The DIYer’s Guide to Brake Inspection article will be split into two parts.
Check out this article to effectively check your brakes without taking the wheels off. This inspection is not recommended before a long road trip or instead of a complete brake inspection.
In Part 2 – Complete Brake Inspection
The article below will cover everything you need know about successfully conducting an in-depth brake inspection. This kind of inspection requires removing the wheels and includes inspecting all brake system components.
Part 2 – The Complete Brake Inspection
Complete brake inspections are recommended anywhere from 7,500 to 10,000 miles. Inspection intervals often depend on how the vehicle is driven. Driving primarily on the freeway would be considered “normal” driving conditions (10,000-mile intervals), while mostly city driving would be considered “severe” driving conditions (7,500-mile intervals). Regardless of how you drive your vehicle, complete brake inspections help ensure it’s safe.
To perform a complete brake inspection, you’ll need to place the vehicle on jack stands to remove the wheels. Find a smooth, flat area that gives you enough room to work and a stable surface to operate a floor jack and place jack stands IMPORTANT: ALWAYS use jack stands.
You will need a few basic tools:
- Floor jack or the jack supplied with the vehicle
- Jack stands (2 or 4)
- Lug wrench or an air or electric impact gun
- Torque Wrench
- 3/8-inch socket set
- 1/2-inch impact socket set
- Ruler (to measure brake pad thickness)
- Outside Micrometer for disc brakes / Inside brake drum micrometer (if applicable)
- Flashlight
- Liquid suction bulb
- Air pressure gauge
Before removing the wheels, inspect the following:
- ABS Warning Light – If you’re ABS warning light is on, check the brake fluid level in the master cylinder fluid reservoir. I know it sounds too easy, but it happens. A low fluid level can trigger the light. If you have a scan tool, retrieve the diagnostic trouble code(s) and make the appropriate repairs if you are able. Otherwise, take your vehicle to a qualified repair shop.
- Parking Brake – Check that the parking brake hand lever or foot pedal has the proper travel. Apply the parking brake to be sure it will hold the vehicle safely on an incline with the transmission in neutral. When the parking brake is applied, the brake warning light in the dash should come on then go out when the parking brake is released.
- Master Cylinder – Check for leaks, the brake fluid level and its color. The fluid should be between the “MIN” and “MAX” marks and be a light gold color. If the brake fluid is at the “MIN” mark, that indicates that the disc brakes are either worn or something is leaking. We’ll determine that later in the inspection.
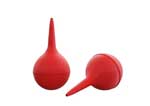 If further inspection reveals no brake system leaks, and the fluid is dark, use a suction bulb (not a turkey baster – they can leak) to remove the old fluid from the reservoir and refill to the “MAX” level line (see image). CAUTION: Brake fluid is highly corrosive and will remove or discolor paint. Do not mix brake fluid with other liquids when you recycle it. Please dispose of it in an earth-friendly manner.
CAUTION: If you replace or top-off the brake fluid reservoir, be sure to use ONLY the type of brake fluid recommended by the manufacturer. It’s typically stamped on the top of the brake master cylinder reservoir cap (Examples: DOT 3, DOT 4) or listed in your vehicle owner’s manual.
- Brake Pedal – Check the pedal for smooth operation and that it has the correct amount of free play. Be sure there is no floor mat or anything else obstructing full travel. Lubricate the pivot pin if necessary.
- Brake Booster – Pump the brake pedal several times to bleed any vacuum in the booster. Push the brake pedal down one more time and hold it. Start the engine. The brake pedal should slightly fall away. NOTE: This test is for vacuum-assist brakes only, not an electronic braking system.
- Tires – Use a gauge to check the air pressure. If necessary, adjust it to the manufacturer’s specifications, which can usually be found inside the driver’s door well. Look for excessive or uneven tread wear, and cuts or damage on the inside and outside of the tires. Don’t forget to check the air pressure in the spare tire.
With the wheels removed, check the following:
If you do not have an air or electric impact gun, there are two ways to remove the wheel lug nuts. One way is to safely support the vehicle on jack stands and have someone step the brakes while you loosen and remove the lug nuts with a lug wrench or ½-inch breaker bar and socket. IMPORTANT NOTE: Do not use a torque wrench to loosen lug nuts!
If you’re by yourself, another method is to break the lug nuts loose while the vehicle is on the ground. Once the vehicle is safely supported on jack stands, you can finish removing the lug nuts. To install all the lug nuts, tighten them the best you can holding the tire with your hand then torque them to specifications once the vehicle is back on the ground.
With all four wheels and tires removed, it’s easy to inspect the brake calipers, rotors or drums, brake pads/shoes and brake lines.
What to look for:
- Brake Calipers – Check for leaks, loose caliper bolts and missing hardware. If you have floating calipers (most common), inspect the rubber caliper slide pin boots for tears or cracks. You can pull them back to check for grease. NOTE: Excessive wear on only one brake pad may indicate that the caliper may not be sliding on the pins. Push the caliper piston(s) back a little then move the caliper back and forth on the slide pins. It should move freely.
 Brake Rotors/Drums – Look for deep grooves or signs of overheating (blue or gold color) on the brake surface. A heavy lip around the edge of the rotor or drum indicates excessive wear. Measure the thickness at a few different points on the rotors with an outside micrometer (see image). Compare your readings to the factory specifications.
 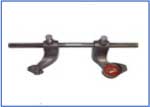 If you have an inside drum micrometer (see image), you can measure wear, but typically if the drums have deep grooves in the surface, it’s best to replace them.
- Brake Pads / Shoes – Check the wear indicators (if equipped) to see if they are touching or almost touching the rotors. Measure the brake pad or shoe material thickness at both ends to check for uneven wear. Compare your results to the manufacturer’s minimum thickness specifications. Also check the brake material for signs of overheating (surface cracks or excessive glazing).
- Brake Hoses / Metal Lines – Check rubber brake hoses for leaks, chaffing or cracks. Inspect the entire length of metal brake lines for leaks, improper routing, chaffing, impact damage or kinks.
Before you put the vehicle back on the ground, make any necessary adjustments such as parking brake cable or brake shoe to drum clearance. When everything looks good, reinstall the wheels. Always torque the lug nuts to the manufacturer’s specifications.
Although this all sounds like a lot of work, after you’ve done it once or twice, it should only take a little over an hour to complete. It’s well worth the time invested for the peace-of-mind you’ll have knowing your brakes are safe. Until next time, safe motoring!
Not an ALLDATAdiy customer? Learn how a subscription could help you. ALLDATAdiy provides access to repair information on over 44,000 engine-specific vehicles, find yours. Return to see more DIY Helpful Tips.