

A DIYer’s Guide to Brake Inspection
When you exit the freeway and apply the brakes, does your entire vehicle, brake pedal or steering wheel shake? Do you hear strange grinding or squealing noises as you come to a stop? When you apply the brakes, does your vehicle pull to one side – or even more terrifying – does the pedal almost goes to the floor? These are all signs that your brakes need IMMEDIATE repairs! Before your brakes get to this point, it’s a much safer, less expensive and time-saving practice to routinely perform brake inspections.
There are two basic types of inspections: a “Quick Inspection” that only takes a few minutes and a “Complete Brake Inspection”, which requires removing the wheels. The DIYer’s Guide to Brake Inspection article will be split into two parts.
Part 1 – The Quick Inspection
The article below explains how to effectively check your brakes without taking the wheels off. This inspection is not recommended before a long road trip or instead of a complete brake inspection.
In Part 2 – Complete Brake Inspection
Check out this article for everything you need to know about successfully conducting an in-depth brake inspection. This kind of inspection requires removing the wheels and includes inspecting all brake system components.
Part 1 – The Quick Inspection
Say you’re at the gas station waiting for 18 gallons of liquid gold to make its way into your fuel tank. You have a little time to kill. Instead of checking your social media page on your phone, you can do a quick disc brake inspection. NOTE: This is a disc brake inspection only. Drum brake inspections require wheel removal.
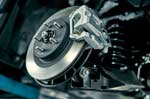
The quick inspection works best on vehicles with open or spoke-type wheels. These are the type of wheels that allow you to clearly see the brake rotors (see image). NOTE: If your vehicle has hub caps, sometimes removing them will allow you to see the rotors through holes in the wheels.
 WARNING: Do not touch your brake calipers or rotors. They will be very hot! Visually inspect the brake rotors through the openings in the wheels. If the rotors have numerous deep grooves cut into the surface, that typically means the brake pads and rotors are worn out. You may have also been hearing a grinding noise when you come to a stop. If the rotors are blue or a dark gold color, that indicates the brakes overheated and need a complete inspection.
You can also see the outside brake pad through the wheels. An easy way to determine if your brake pads are worn out is to compare the brake pad’s friction material to its metal backing. If the thickness (1) of the friction material (2) is equal to or less than that of the metal backing (3), it’s time to replace the brake pads (see image). In my experience, this method is fairly accurate.
If you want to be 100 percent sure, you can measure the pad material thickness once you’ve removed them. TIP: To save a lot of time, buy replacement brake pads first in case your measurements verify that they are worn out. The minimum thickness specifications can be found in a manufacturer’s service manual or sometimes in the owner’s manual. ALLDATA DIY is a great resource for specifications and repair procedures.
 To warn you that your brake pad material has reached minimum thickness, some manufacturers use soft metal wear sensors that scrape the rotor to create a squealing noise while braking (see image). During your quick visual check, if you see that a wear sensor is touching or nearly touching the rotor, replace the brake pads.
IMPORTANT NOTE: I’ve rarely seen a situation where the outside brake pad was fine, but the inside pad was worn out … but it does happen. This condition usually means the brake caliper is defective in some way. To see the inside brake rotor surface, you’ll need to kneel or squat down and use a flashlight. There may be a splash plate obstructing your view of the inside surface of the rotor, but you can usually look through a gap near the caliper.
That concludes the quick brake inspection. It should only take about 5-10 minutes to complete. Although it doesn’t take much time, it’s a very effective way to identify potential problems before they become big problems. Until next time, safe motoring!
Not an ALLDATAdiy customer? Learn how a subscription could help you. ALLDATAdiy provides access to repair information on over 44,000 engine-specific vehicles, find yours. Return to see more DIY Helpful Tips.