
Hot times in the Equinox
Diagnostic Digest Volume 2
Father’s Day was a few days away at the Kempt Garage. Kyle contemplated the new tie his kids would almost certainly give him; ties were something he only wore at weddings and funerals. As the busy owner of a garage that bore his last name, he was thankful that neither of those events was occurring this week. The temperatures were ramping up and the number of heat-related diagnostic cases increased commensurately. A local mom and high school teacher, Heidi Hagan, had dropped off her 2016 Chevy Truck Equinox SUV earlier that day with a complaint of “air conditioning not working.”
Equipped with the 4-cylinder 2.4L Ecotec engine and having amassed 91,000 miles, the Chevy had been reasonably reliable until now. She bought it new, and Kyle warned her six years ago to service the Equinox more often than the car’s dashboard recommended oil and filter changes. So far, the timing chain tensioners were holding up well and the check engine light had never bathed the dash in a warm glow.
Kyle fetched the Equinox from the corner of the lot and pulled it into the third bay. He confirmed that the compressor clutch was not engaging on the manual A/C system. The Chevy uses a variable-displacement compressor with a conventional belt-driven magnetic clutch.
He wondered if the system had any R-134a in it; the proper charge was 1.43 lbs. With the current ambient temperature of 85°F a properly charged system should show about 95 psi on both high and low sides while OFF according to the R-134a temperature/pressure chart. The pressure was a bit below that at 80 psi, but Kyle’s experience told him that should be adequate pressure to allow the Engine Control Module (ECM) to activate the compressor clutch.
Kyle reviewed the service information for the conditions needed to activate the compressor:
- Battery voltage between 9–18 V
- Engine coolant temperature less than 124°C (255°F)
- Engine speed greater than 600 RPM
- Engine speed less than 5500 RPM
- A/C high side pressure between 269–2,929 kPa (39–425 PSI)
- Throttle position less than 100%
- Evaporator temperature greater than 3°C (38°F)
- ECM does not detect immoderate torque load
- ECM does not detect insufficient idle quality
- The ambient temperature is above 1°C (34°F)
While the pressure gauges and dashboard coolant temperature gauge appeared to be within those conditions, Kyle’s question was “What did the ECM think the conditions were?” It was time to hook up the scan tool.
Scan tool values were all within specification except for one; the high side pressure showed 480 psi. The scan tool said the high side A/C Refrigerant Pressure Sensor voltage value was 4.99 volts which was essentially the reference voltage. Kyle now knew why the Equinox didn’t blow cold air: the ECM thought the high side refrigerant pressure was too high.
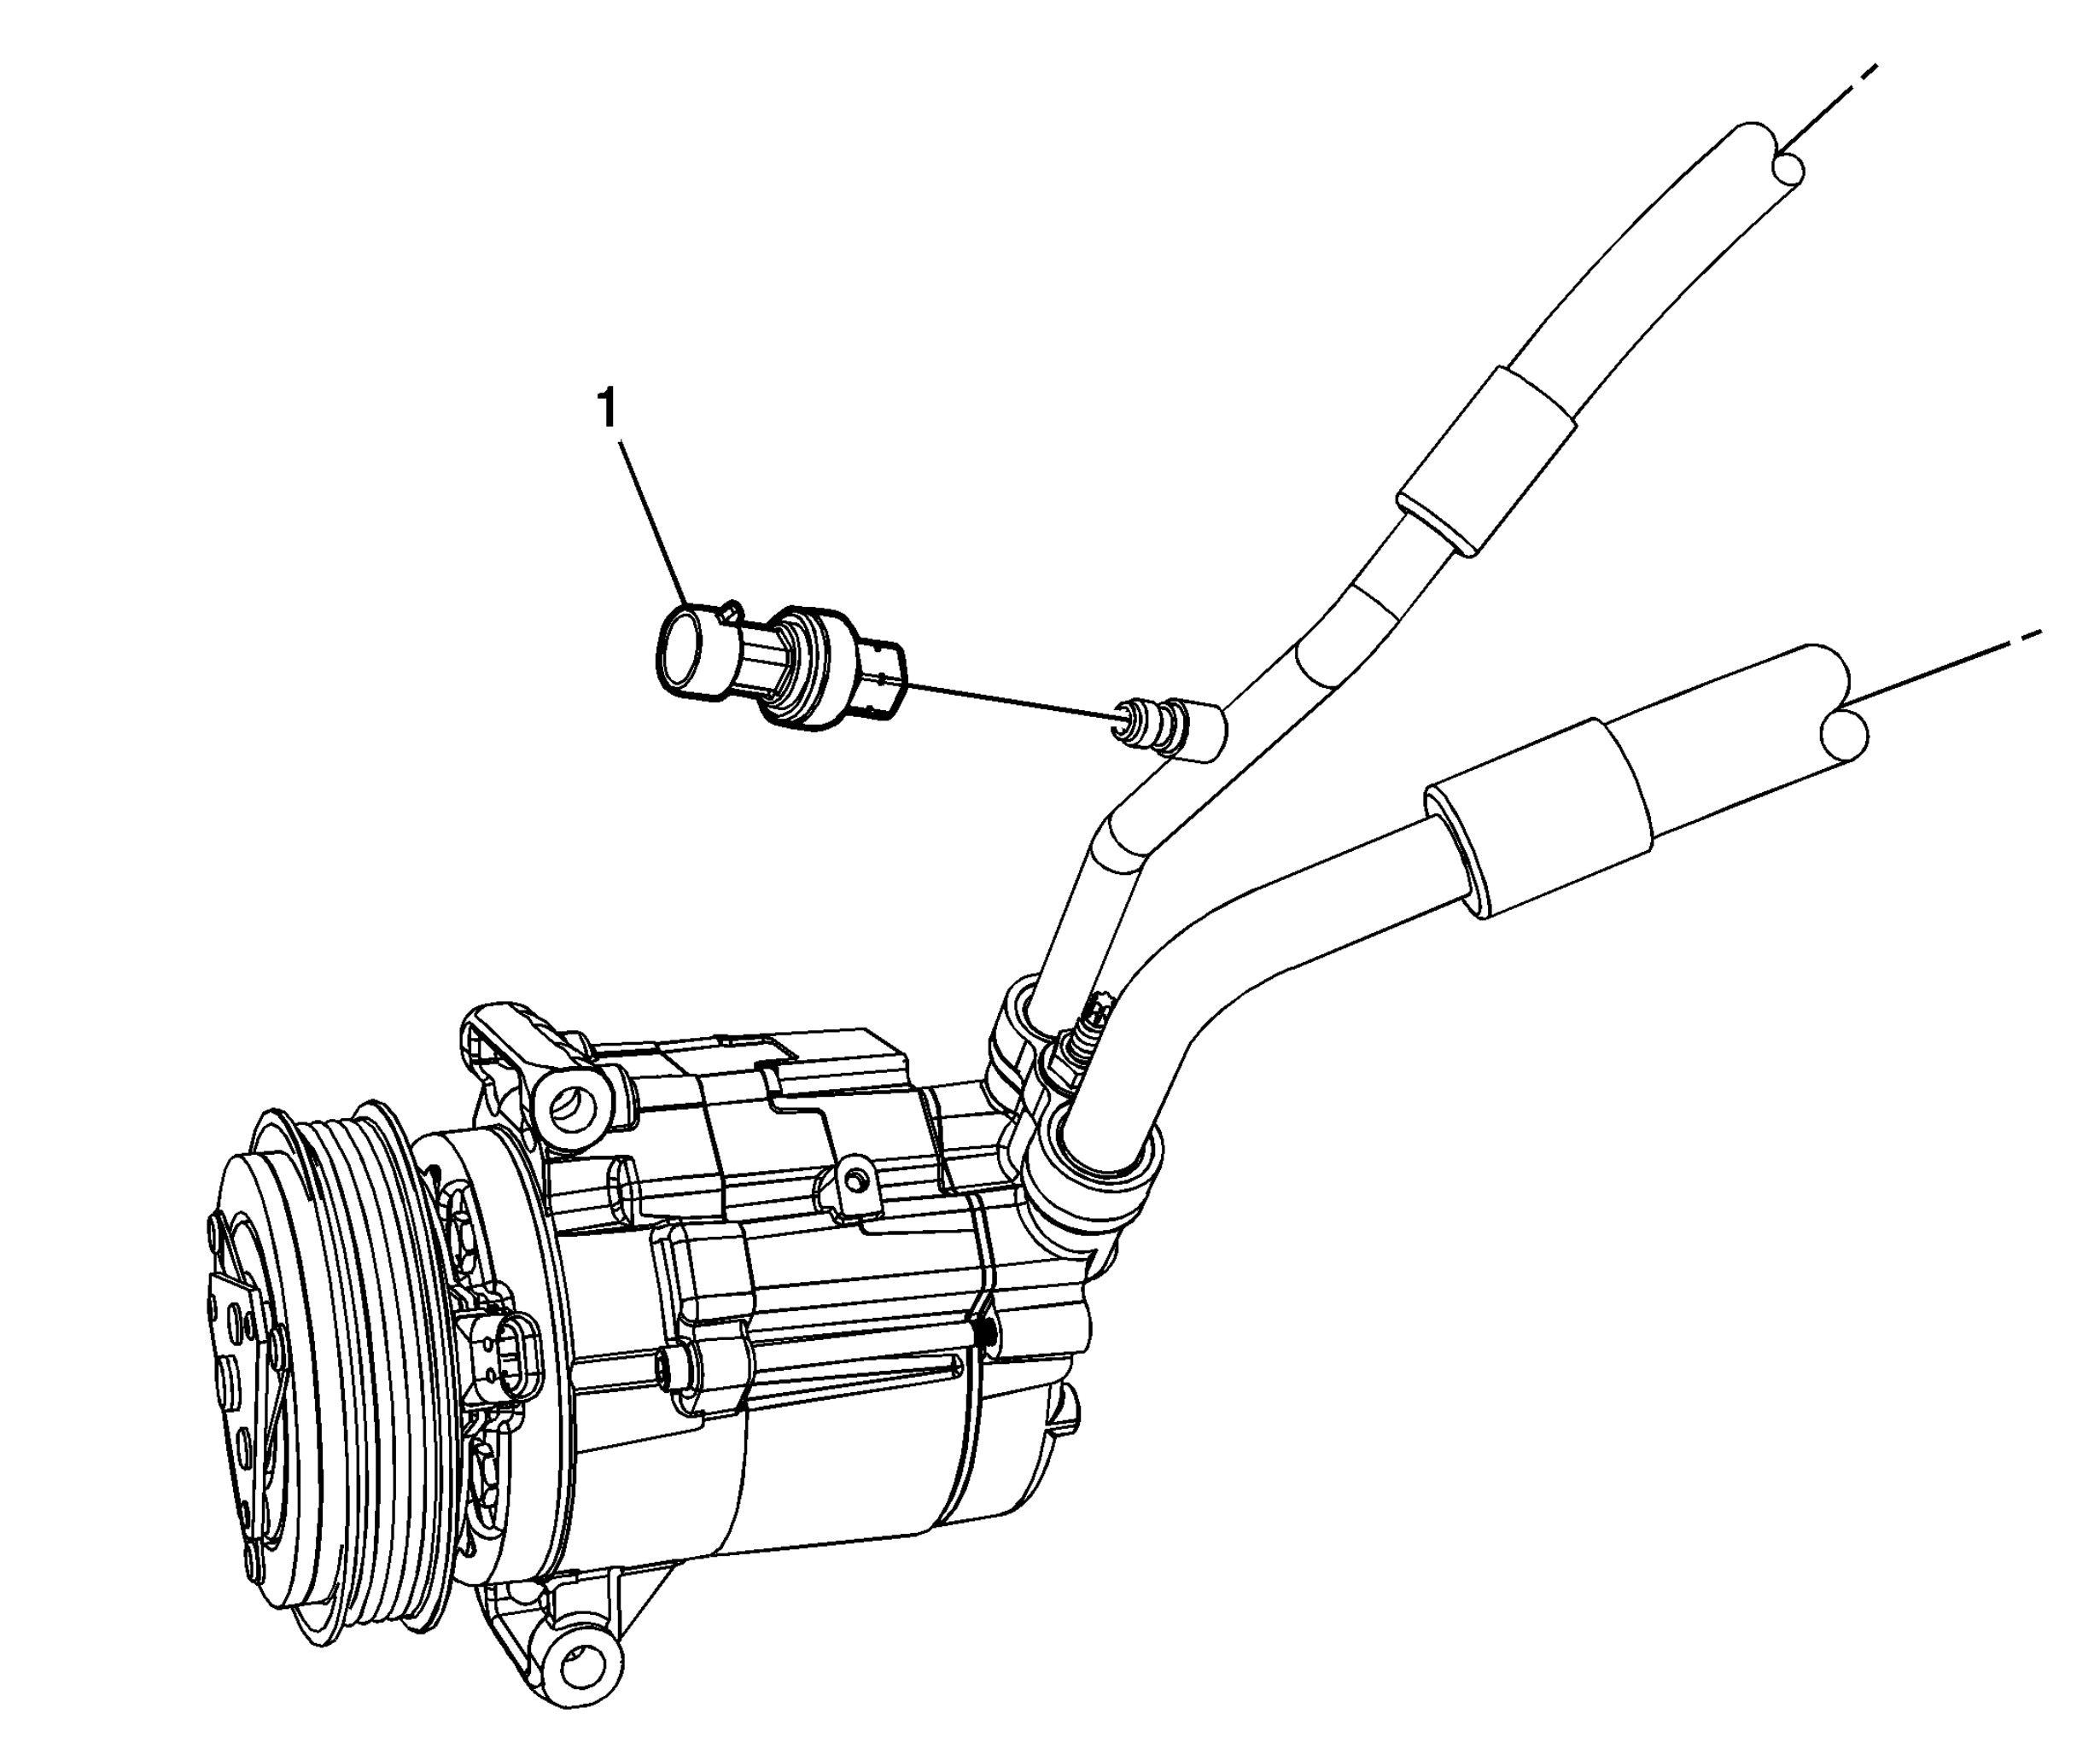
The Equinox’s high side A/C Refrigerant Pressure Sensor was located on the liquid line near the compressor discharge port.
After studying the wiring diagram and other service information, he determined the sensor operated much like a throttle position sensor potentiometer with a 5V reference signal, a ground, and a voltage signal that varies with pressure.
The most likely cause of the ECM determining that the High Side Pressure is excessive is a defective high side A/C Refrigerant Pressure Sensor. But, before Kyle installed a new sensor he tested the circuit using jumper wires and his scan tool. All tests were made at the B1 connector (for the high side A/C Refrigerant Pressure Sensor) with it unplugged from the sensor.
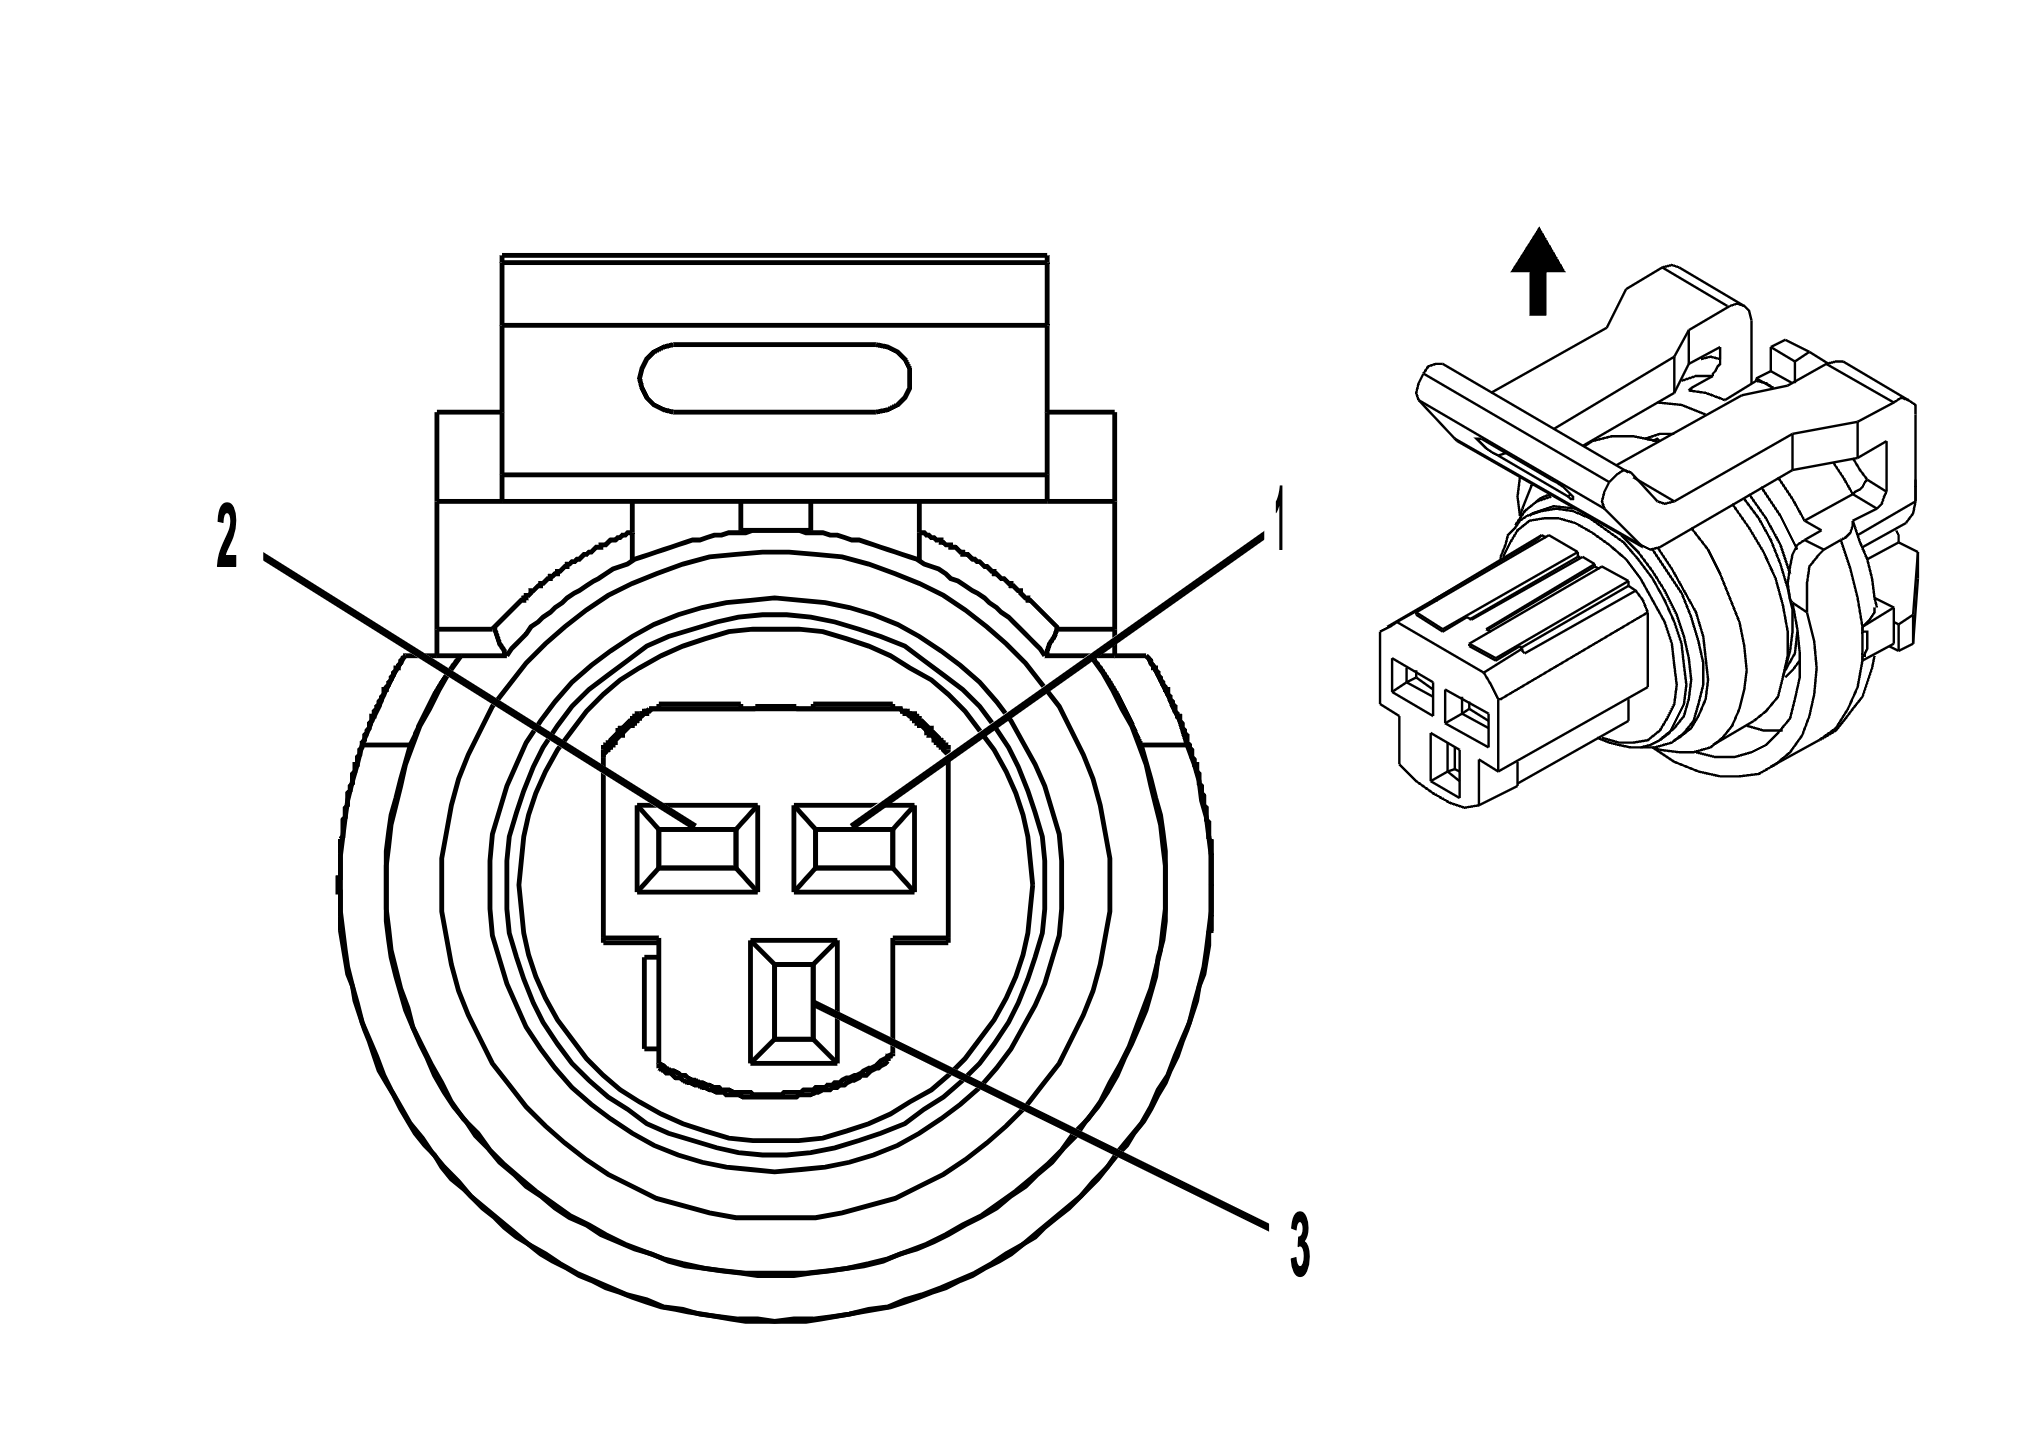
| Pin | Size | Color | Circuit | Function |
|---|---|---|---|---|
| 1 | 0.5 | TN | 5514 | A/C Refrigerant Pressure Sensor Low Reference |
| 2 | 0.5 | GY | 2700 | A/C Refrigerant Pressure Sensor 5V Reference |
| 3 | 0.5 | 0G/BK | 380 | A/C Refrigerant Pressure Sensor Signal |
He carefully jumped the 5V reference on Pin 2 (A/C Pressure Sensor 5V Reference) to the Signal on Pin 3 (A/C Refrigerant Pressure Sensor Signal) and the scan tool showed the high side A/C Refrigerant Pressure Sensor voltage value was 5V. So far, so good.
Kyle then added another jumper between Pin 1 (A/C Refrigerant Pressure Sensor Low Reference/Ground) and Pin 3. If all the wiring between the connector and the ECM was good, and the ECM was interpreting the signal correctly, the scan tool voltage value should show zero Volts as it is being pulled down to ground.
The scan tool displayed the high side A/C Refrigerant Pressure Sensor voltage value as zero Volts. Kyle thought, “It’s a slam-dunk diagnosis, it needs a new high side A/C Refrigerant Pressure Sensor.”
Something gnawed at him; what if there was a bad connection at one of the pins? He carefully inspected the female pins in the B1 connector and they all looked good. He had some male pins of appropriate size available, so he checked the pin fit and found the female terminals to have proper tension. “OK,” he thought, “it definitely needs a new A/C Refrigerant Pressure Sensor.”
Kyle called a local parts store and learned that sensor was on backorder. He was starting to worry about how long it would take to get a new sensor for Heidi’s Chevy. His worry led to fretting, but then Kyle remembered an article he read in 2009 on “fretting corrosion.” Perhaps that was creating enough resistance on Pin 1 that there was an open ground connection at the B1 sensor connector?
When resistance-building oxides form between two electrical contact surfaces it results in what is known as “fretting corrosion.” Movement between the contacting surfaces as small as 10 to 100 microns can cause fretting. To put this in perspective, a sheet of paper is about 100 microns thick, so the fretting motion is small and hard to see. Vibration and thermal expansion and contraction are the main causes of fretting motion. Because vehicles vibrate and experience large temperature swings they are fertile ground for fretting motion. Tin, copper, nickel, and iron surfaces are all susceptible to fretting corrosion.
Even gold can sometimes experience corrosion because the gold plating is very thin and can wear away.
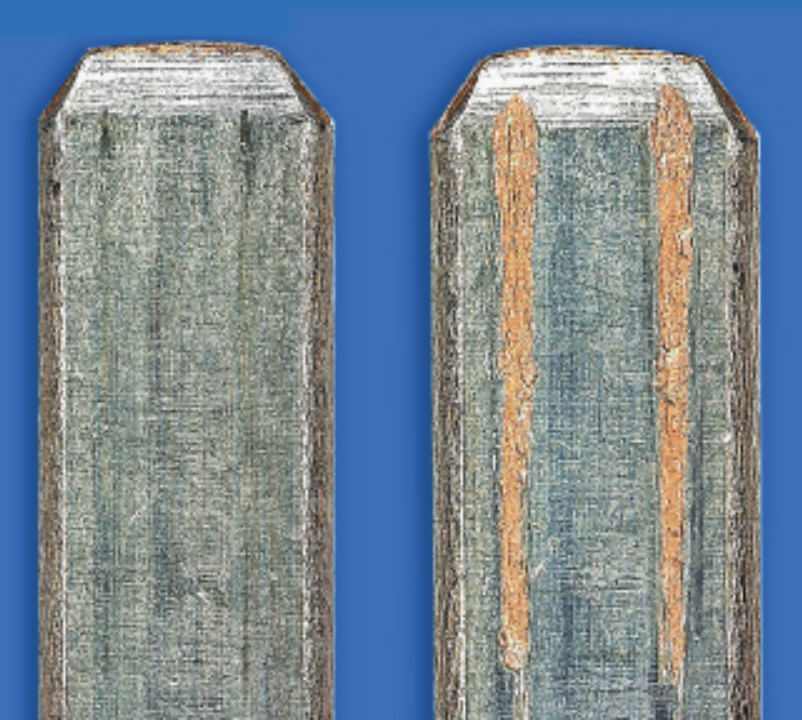
Fretting corrosion can be difficult to see but it looks like small, dark smudges on the terminals’ contact surface. This corrosion makes it almost impossible for electrons to move across the terminals.
Kyle did some research and found that two good treatments existed for the poor contact: Nyogel 760G (aka AC Delco Connector Grease) and Stabilant 22a (first developed for audio use and then the defense and aerospace industries took note of it). Since Stabilant 22a was available at a local auto parts store and was known to reduce electrical resistance of connectors, Kyle gave it a shot.
After applying some to the terminals and waiting 3 minutes, he plugged the B1 connector back into the high side A/C Refrigerant Pressure Sensor. With a lot of confidence and some hope Kyle started the engine, turned on the A/C and cold air soon began to flow from the dash vents. The pressures were just below specification for the ambient temperature so refrigerant recovery, evacuation, and a charge with fresh R-134a to a weight of 0.65 kg/1.43 lb brought the running pressures and Maximum Left Center Discharge Air Temperature well within the manufacturer’s A/C Performance Table specifications.
| Ambient Temperature | Relative Humidity | Low Side Service Port Pressure | High Side Service Port Pressure | Maximum Left Center Discharge Air Temperature |
|---|---|---|---|---|
| 13-18°C (55-65°F) |
0-100% | 151-199 kPa (22-29 psi) | 799-1129 kPa (116-164 psi) | 12°C (52°F) |
| 19-24°C (66-75°F) |
Below 40% | 151-220 kPa (22-32 psi) | 950-1309 kPa (138-190 psi) | 12°C (52°F) |
| Above 40% | 151-248 kPa (22-36 psi) | 999-1391 kPa (145-202 psi) | 13°C (55°F) | |
| 25-29°C (76-85°F) |
Below 35% | 165-241 kPa (24-35 psi) | 1178-1502 kPa (171-218 psi) | 13°C (54°F) |
| 35-50% | 179-254 kPa (26-27 psi) | 1219-1543 kPa (177-224 psi) | 13°C (54°F) | |
| Above 50% | 213-303 kPa (31-44 psi) | 1460-1880 kPa (212-273 psi) | 15°C (59°F) | |
| 30-35°C (86-95°F) |
Below 30% | 186-268 kPa (27-39 psi) | 1357-1708 kPa (203-258 psi) | 14°C (57°F) |
| 30-50% | 199-282 kPa (29-41 psi) | 1398-1777 kPa (218-263 psi) | 14°C (57°F) | |
| Above 50% | 227-303 kPa (33-44 psi) | 1515-1839 kPa (220-267 psi) | 15°C (59°F) | |
| 36-41°C (96-105°F) |
Below 20% | 213-296 kPa (31-43 psi) | 1570-1901 kPa (228-278 psi) | 15°C (59°F) |
| 20-40% | 220-310 kPa (32-45 psi) | 1598-1977 kPa (232-278 psi) | 15°C (59° F) | |
| Above 40% | 234-323 kPa (34-47 psi) | 1667-2060 kPa (242-299 psi) | 17°C (61° F) | |
| 42-46°C (106-115°F) |
Below 20% | 248-316 kPa (36-46 psi) | 1777-2087 kPa (258-303 psi) | 17°C (61° F) |
| Above 20% | 254-330 kPa (37-48 psi) | 1818-2177 kPa (264-316 psi) | 18°C (63°F) | |
| 47-49°C (116-120°F) |
Below 30% | 275-351 kPa (40-51 psi) | 2011-2328 kPa (292-338 psi) | 18°C (64°F) |
Total time for the diagnosis was less than 30 minutes with another 1.4 hours for recovery, evacuation, and recharging. Kyle was happy, Heidi was very ecstatic and much cooler, and another entry was made in the “win” column.
As for Father’s Day, perhaps Kyle could convince the kids (and their mom) that the only ties he wanted were on the laces of some new running shoes.
Editors Note: Diagnostic Digest uses real life diagnostic scenarios with appropriately ficticious characters and locations to illustrate real world diagnostic techniques.
Want to see how ALLDATA can improve shop efficiency? Check out our suite of products, each designed to contribute to both shop efficiency and productivity.
If you would like to read more articles like this one please subscribe to ALLDATA News.
