12 Steps to Flawless Plastic Body Repairs
Did you hear the one about the vehicle that collided with a collision shop? No joke… It really happened in Texas in early 2014. An SUV demolished a collision shop’s wall and ended up on its roof inside a storage area. No word on whether or not that particular shop was selected for the repair.
Most vehicles probably do not enter your shop in such a dramatic fashion. But what IS dramatic is the way vehicles are being constructed these days. Cars and trucks built with new materials – advanced steels, aluminum, carbon fiber, and plastics have replaced those heavyweight steel models that used to rule the roads.
You have, no doubt, heard of the enormous ‘plastic islands’ – huge concentrations of plastic waste – that are found in the world’s oceans. Ford® is helping relieve the situation a bit by collecting millions of clear plastic bottles – not to turn in for nickels, but to recycle as vehicle components. For a few years now, manufacturers have been incorporating recycled materials into their cars. The Ford Focus®, for instance, has seats made, in part, from those recycled bottles (about 22 per vehicle). But many other components are also plastic.
These are a few plastics that shops like yours have to deal with:
- Thermosetting plastics – Cannot be remolded and require a 2-part adhesive for repair.
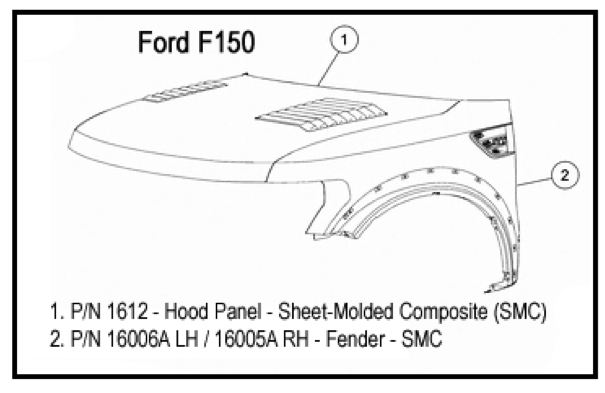
- Sheet-Molded Composites – A type of thermosetting plastic, which Ford uses in fenders, hoods and liftgates.
- Thermoplastics – Can be remolded repeatedly by reheating, and are used as interior trim components, wheel flares, body side cladding and bumper covers.
- Polyolefins – Thermoplastics with an oily or waxy feel when sanded or ground. Adhesive materials and paint will not stick to polyolefins unless an adhesion promoter is first applied. Polyolefins are used in bumper covers, fan shrouds and wheel housings.
Ford publishes a great deal of information on identifying and repairing the plastics used in its vehicles. Here is just part of Ford’s OEM information specifically describing a sheet-molded composite (SMC) panel repair:
WARNING:
- Always wear protective equipment including eye protection with side shields, and a dust mask when sanding or grinding. Failure to follow these instructions may result in serious personal injury.
- Always refer to MSDS when handling chemicals and wear protective equipment as directed. Examples may include but are not limited to respirators and chemically resistant gloves. Failure to follow these instructions may result in serious personal injury.
- In deciding whether to repair or install a new component, follow these guidelines.
- Is a new part readily available?
- Can the damaged part be economically returned to its original strength and appearance, or will the labor cost exceed the cost of a new component?
- Will repair provide for the fastest, highest quality result?
- NOTICE:
- Never apply solvents such as lacquer thinner or reducer at any stage of plastic repair. Solvents, cleaners and water are absorbed by many types of plastics and by the glass fibers used for reinforcements. If this occurs, the plastic may swell in the area of repair and cause the repair to fail. Remove cleaners and water quickly and use air and heat to speed up drying.
- During the repair of many plastics and particularly polyolefin plastics, an adhesion promoter must be applied to the substrate to allow repair materials and paint to bond correctly. Reapplication is required when grinding or sanding through the sealer or primered layers.
NOTE: When possible, it is recommended to carry out as much of the plastic repair as possible on the vehicle. Parts mounted on the vehicle are held in correct alignment throughout the repair. Attempting to repair the part off the vehicle may cause misalignment. This could lead to failure of the repair. - Always refer to the manufacturer's label directions for the type of repair materials, fillers and bonding agents being used as they are material specific.
- The following procedure applies to repair of structural cracks and large gouges. If damage is cosmetic, use of reinforcing cloth may not be necessary.
- Panels to be repaired should be dry and at room temperature 18 C (64.4 F) to 24 C (75.2 F) prior to carrying out any repairs. Both sides of the panel must be thoroughly cleaned before sanding or grinding.
- Cover the break in the SMC (front and back) with masking tape. This protects the damaged area from absorbing the prep cleaner and eliminates wicking of the cleaner through the fibers into the SMC.
- Remove all waxes, silicones, dirt and road oils from the area surrounding both sides of the damaged area with a plastics wax and grease remover.
- Remove the tape and sand the back of the repair area with an angle grinder, D/A sander or by hand using 80-grit sandpaper. Remove all dust with a vacuum and tack cloth.
- Create a reinforcing patch using a piece of scrap SMC that conforms well to the back of the damaged area or form a patch from fiberglass cloth.
- Cut a section of cloth large enough to cover the repair, plus 25.4 mm (1 in) around the repair area.
- Cut a section of plastic film backing approximately 25.4 mm (1 in) larger than the cloth. Lay the plastic on a smooth, flat surface where it will be used to create a pyramid patch.
- Follow manufacturer's directions and apply plastic repair adhesive to the plastic film backing and smooth with plastic spreader to recommended thickness. Place the pre-cut fiberglass cloth on the adhesive-coated plastic film. Cover the cloth with a coat of repair adhesive and spread to the recommended thickness.
- Apply the prepared patch to the backside of the panel and compress. Follow manufacturer's instructions for adhesive cure. Remove plastic film after adhesive cures and sand as necessary to remove roughness.
- Remove masking tape from the front side of damaged area and grind down to the backing patch. Use an angle grinder with a 30 to 40-grit wheel. Make a gradual taper in the area. This will prevent bull's-eyes or read-through in the finished repair. Sand prepared area with a D/A sander or hand-sand with 80-grit sandpaper.
- Build a pyramid patch using fiberglass cloth or equivalent and plastic repair adhesive. Following manufacturer's directions, apply patch to damaged area.
- Rough-grind area to remove excess adhesive. Sand repair area with 80-grit sandpaper, making sure to cut slightly below the SMC finished surface. This will allow for a finish coat of plastic body repair material.
- Apply a finish coat of plastic repair filler material per manufacturer's directions.
- Finish-sand, prime and topcoat using Ford-approved paint systems.
NOTE: This repair/service information is excerpted from information published by the vehicle manufacturer, and is intended for the purpose of promoting OE collision repair information to trained, professional technicians with the knowledge, tools and equipment to do the job properly and safely. Before attempting any repairs described, refer to the complete article in ALLDATA Collision. It is recommended that these procedures not be performed by “do-it-yourselfers.”
Karl Kirschenman, ALLDATA Collision Product Manager, holds a Bachelor of Science degree in communication. He has over 10 years of experience in the collision industry. ©2014 ALLDATA LLC. All rights reserved. All technical information, images and specifications are from ALLDATA Collision S3500. ALLDATA and ALLDATA Collision are registered trademarks of ALLDATA LLC. Ford, Focus and and F150 are registered trademarks of Ford Motor Company. All other marks are the property of their respective holders.The ALLDATA Tech-Assist team fields cases like this every day. See how Tech-Assist can help your shop save time and money with on-call diagnostic support from ASE-certified Master Technicians. More Tech Tips
Not an ALLDATA customer? For access to this valuable experience-based repair data and reliable OEM information, start a free trial today.
If you would like to read more articles like this one please subscribe to ALLDATA News.