


"Pre-Venting" a Leaky Ford Axle Vent
There are a lot of older cars on the road, and you probably see your share of them in your shop. While you may expect to see leaky hoses on higher mileage vehicles, sometimes the cause
is not so obvious. Diagnosing a problem takes time – time that translates to money out of your customers’ wallets. That’s where OE repair procedures and technical service bulletins (TSBs) come in.
Always check for a factory-issued TSB first – even when the concern seems straightforward. You may be surprised to find a solution already spelled out for you. If your customers are trying to keep those old wheels turning for a while longer, they will appreciate you saving them some money with a quick repair. And they will be happy to learn that you service and repair their vehicles to manufacturers’ standards. Happy customers may bring you more business through word-of-mouth advertising.
Here’s an example of a TSB issued by Ford:
Some owners of 4×4 and AWD Ford® or Mercury® SUVs and trucks may complain of a fluid leak from the front axle vent tube. This may be caused by fluid being thrown toward the axle vent by the gears during vehicle operation. To correct this problem, install a revised front axle cover kit, as described in this Tech Tip. The revised cover has a baffle built in to reduce the possibility of fluid being thrown out of the vent during vehicle operation.
Applicable Vehicles
1995-2001 Explorer®
1997-2005 Ranger®
2001-2003 Explorer Sport®
2001-2005 Explorer Sport Trac®
1997-2001 Mercury Mountaineer®
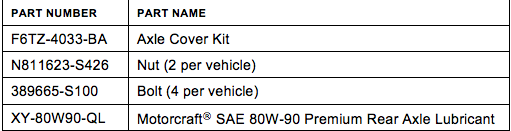
Parts Information
Service Procedure
Review safety procedures in ALLDATA Repair® S3000 before beginning.
NOTE: DO NOT FOLLOW THE SERVICE PROCEDURE OUTLINED IN THE DANA® SPICER® INSTRUCTION SHEET INCLUDED IN THE COVER KIT. FOLLOW THE SERVICE PROCEDURE BELOW.
- With the vehicle in NEUTRAL, raise and support the vehicle.
- Remove the lower engine splash shield, if equipped.
- Index-mark the front axle pinion flange and the front driveshaft.
- Remove the driveshaft bolts and retainers. Discard the driveshaft bolts.
- Tape the U-joint bearing caps to prevent them from falling off the U-joint.
- Swing the driveshaft away from the axle pinion yoke and secure out of the way.
- Remove the three (3) axle support mounting bracket bolts from the axle housing.
- Position suitable jack beneath axle housing.
NOTE: PLACE FOLDED SHOP TOWELS OR SUITABLE SOFT MATERIAL OVER TORSION BARS TO PROTECT THE HALFSHAFT BOOTS AND CLAMPS FROM DAMAGE.
- Remove the two (2) bolts and nuts from the front axle support bushings. Discard the nuts.
- Carefully lower and position the axle housing until it is resting on the torsion bars.
- Disconnect the vent hose from the axle housing.
- Position a drain pan under the axle housing cover. Rotate the axle housing slightly to allow easy access to the axle cover bolts. Remove the axle housing cover and discard.
- Clean the axle housing cover mounting surface.
- Apply a continuous bead of silicone rubber RTV (included in the kit) to the new cover sealing surface.
- Install the new cover to the axle housing. Install the new vent hose and clip from the kit to the cover (Figure 1). Tighten all bolts to 20-25 ft-lb (27-34 Nm).
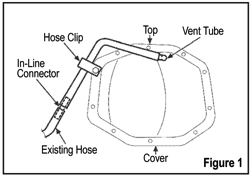
- Connect the new vent hose to the existing vent hose using the in-line connector supplied in the kit (Figure 1).
- Remove the old vent from the axle assembly and install the pipe plug supplied in the kit.
- Raise the axle into position and install the axle support bushing bolts and NEW nuts. Torque the bolts to 49 ft-lb (66 Nm).
- Install the axle support-mounting bracket to the axle housing. Torque the bolts to 78 ft-lb (106 Nm).
- Install the driveshaft using new bolts. Torque to 14 ft-lb (19 Nm).
- Remove axle housing fill plug and fill with 3.25 pints (1.54 L) of Motorcraft SAE 80W-90 Premium Rear Axle Lubricant. Install fill plug.
NOTE: This Repair/Service Procedure is excerpted from a Technical Service Bulletin published by the vehicle manufacturer, and is intended for use by trained, professional technicians with the knowledge, tools and equipment to do the job properly and safely. It is recommended that this procedure not be performed by “do-it-yourselfers.”
Want to see how ALLDATA can improve shop efficiency? Check out our suite of products, each designed to contribute to both shop efficiency and productivity.
If you would like to read more articles like this one please subscribe to ALLDATA News.
