
student, fix my car
Diagnostic Digest Volume 4
As the lead instructor of a community college automotive technology program, Ben Breedlove often found himself with the unenviable task of fixing students’ mistakes. Ten years ago, he was the shop foreman of a Toyota dealership service department. At least once a week, he had to rescue a dealership technician from the aftereffects of a misdiagnosis or a botched repair procedure.
Now, at the college, bailing out students from repairs gone wrong was a once-a-day task. One that Ben would gladly share with a willing and capable student.
Sarah was ranked as the top student. By her second year she was tutoring other students, assisting professors in class, and proficient in scan tool diagnostics and digital storage oscilloscope usage. Because of her automotive prowess, Ben often gave her other students’ mistakes to rectify. And she always fixed those issues quickly, with high quality workmanship.
Now she had another vehicle to fix. This problem would involve most of the skills a journeyman technician would possess. Sarah believed she was ready for the challenge.
Two first-year students had changed a leaky heater core on a 2013 Ford Truck Escape 4WD with a 2.0L Turbo engine. This repair required the removal of the dashboard and center console. Because the steering column blocked the dash removal, it needed a partial disconnection so it could be pivoted out of the way.
The job typically would take a seasoned tech seven hours; the novice techs took two full days. At the end of the job, the SUV started and ran fine, and coolant was no longer soaking the carpet. The Escape was returned to its owner, the chairperson of the math department. The math wiz had grown up in Chicago traffic and was well versed in the use of the horn (and other forms of signaling displeasure) on her fellow drivers. The first time she was back in traffic, however, she quickly realized that the horn wasn’t up to honking; it worked fine before the heater core replacement, but now it was silent.
Sarah gave the vehicle a thorough visual inspection in hopes that something obvious would reveal itself. Nothing was found.
Moving on, she reviewed the heater core replacement procedure and found this:
NOTICE: Do not allow the steering wheel to rotate while the steering column shaft is disconnected, or damage to the clockspring may result. If there is evidence that the shaft has rotated, remove and recenter the clockspring. For additional information, refer to Restraints and Safety Systems &/or Air Bag Systems.
Perhaps the students had damaged the clockspring? That could result in the horn failing. However, it would likely result in a Supplemental Restraint System (SRS) light as well as failure of the steering wheel mounted volume control and other steering wheel button functions. These functions were fine and there was no SRS warning light. Sarah decided to put that possibility on the back burner.
It was time to delve into the workings of the horn system. Service information revealed the following block diagram:
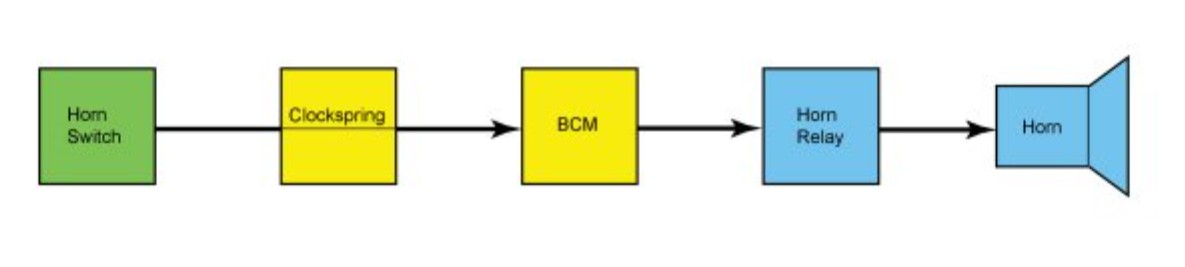
Accessing the Body Control Module (BCM) with a scan tool might prove useful. While there were no trouble codes, Sarah was able to use function/actuator tests built into the college’s ALLDATA scan tool to honk the horn repeatedly. This saved her from checking fuses and wiring between the BCM and the horn. That shifted her focus onto the horn switch and clockspring. She needed to verify that the wiring between the clockspring and the BCM was good before she could condemn the clockspring. Because the steering column had been disturbed there could be other reasons for the failed horn.
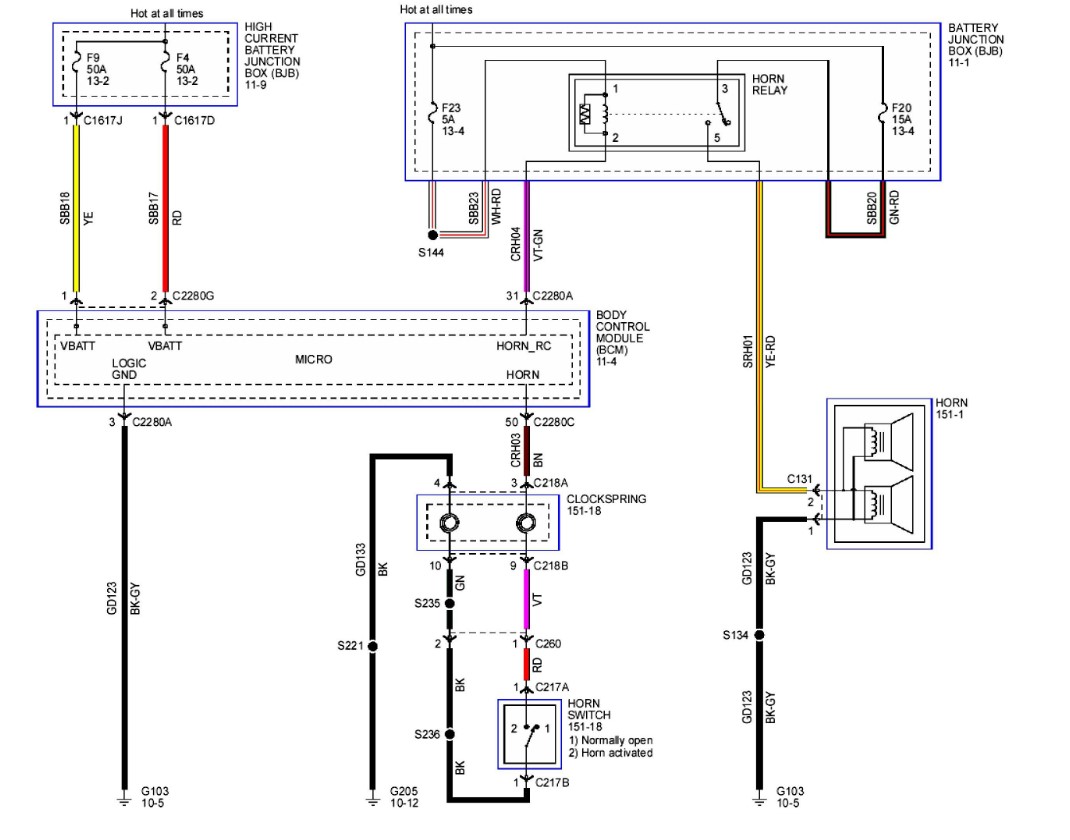
The Ford “PINPOINT TEST A: THE HORN IS INOPERATIVE” has the following test to isolate the horn switch and clockspring:
A2 CHECK HORN OPERATION WITH HORN SWITCH CIRCUITS ISOLATED
WARNING: Turn the ignition OFF and wait one minute to deplete the backup power supply. Failure to follow this instruction may result in serious personal injury or death in the event of an accidental deployment.
NOTE: This test is carried out with a fused jumper wire at the female (harness) side of the connector.
- Ignition OFF (see warning above)
- Remove the Driver’s Air Bag
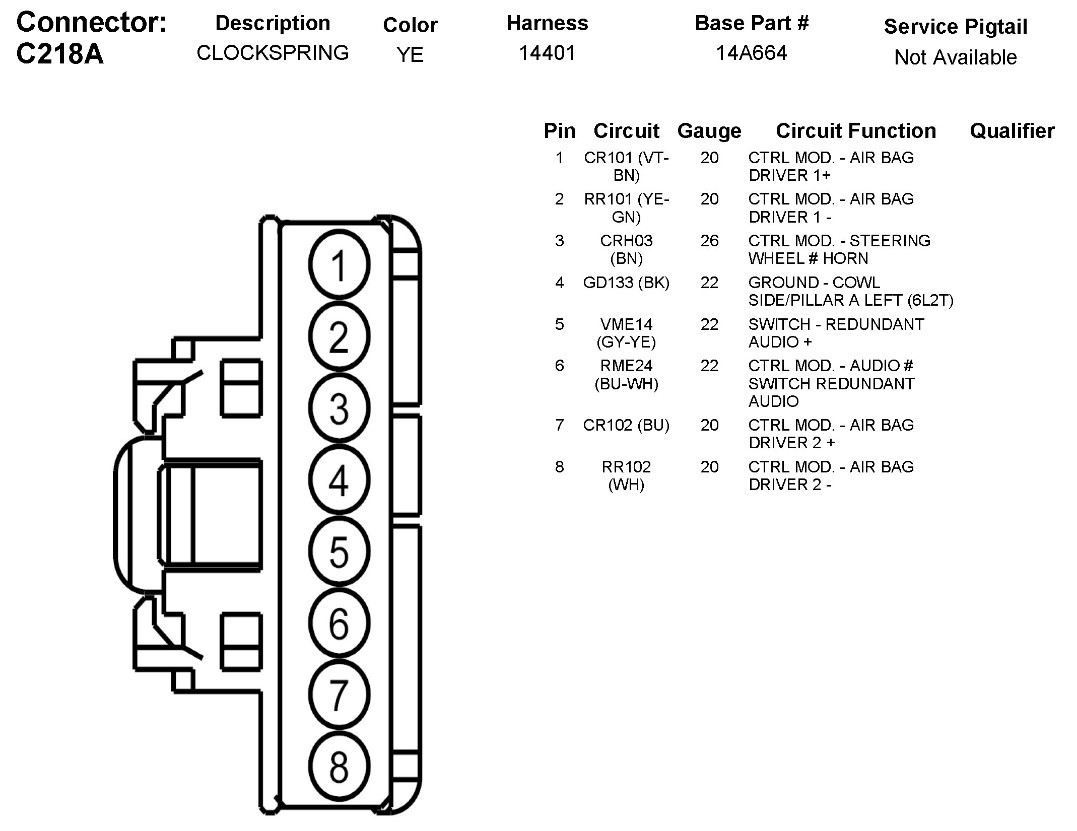
- Disconnect the Clockspring Connector C218A
She connected a fused jumper wire between the female Pin 3 and Pin 4 on the connector C218A. The horn should honk IF the wiring between C218A and the BCM C2280C connector is good AND the BCM itself is good.
The horn did not honk. She applied a ground directly to Pin 3 to rule out a bad ground wire going to Pin 4 at C218A. Still no horn.
It was time to determine the integrity of the Brown (BN) wire between C218A and C2280C. The easiest way to do that was to ground Pin 50 at C2280C. If the BN wire is good the horn will honk. Sarah back-probed Pin 50 while it was still plugged into the BCM. Result: HORN HONKED!
A visual inspection revealed that the BN wire was cut through near the halfway point. This could be damage from the students, or it could have been partially cut during vehicle assembly at Ford and moving the steering column completed the severing of the wire.
Sarah soldered in a new section of wire, used foam tape to protect the repair, reinstalled the airbag assembly, and sent the Ford back to the math department chairperson with a fully functional horn.
She had fixed the SUV and could now head home for the day. You might say she made her Escape.
Editors Note: Diagnostic Digest uses real life diagnostic scenarios with appropriately ficticious characters and locations to illustrate real world diagnostic techniques.
Want to see how ALLDATA can improve shop efficiency? Check out our suite of products, each designed to contribute to both shop efficiency and productivity.
If you would like to read more articles like this one please subscribe to ALLDATA News.
