Copying DATA Discs to your Computer (Both Repair and P&L Information)
Benefits of copying your ALLDATA® Repair DVDs to your computer's hard drive:
-
Lost or damaged discs can slow down or stop your work, costing you time and money.
-
Saving your discs to the computer keeps the information most easily available.
There are two types of ALLDATA Repair DVDs: DATA discs and SERVICE ADVISOR discs.
-
This article explains how to copy the DATA discs - the discs that have both repair information and service advisor information for domestic and import vehicles.
-
If your shop receives both the DATA discs and the SERVICE ADVISOR discs in the mail, copy only the DATA discs - they contain all of the SERVICE ADVISOR information.
-
To copy DATA discs to the computer hard drive:
IMPORTANT -
-
You MUST have the most current version of ALLDATA Repair (DVD) installed before the new DVDs can be copied.
-
If your shop's computers are networked to be able to share ALLDATA information with each other, the following prodecure should be done on the SERVER computer.
-
Make sure that there is (or will be) enough space on the hard drive to save the discs.
-
As of August 2013 (Q313), the total space needed for all 86 data discs is 558 GB.
-
In order to function properly, your hard drive will also need to have at least 10-15% available space left after copying the discs.
-
Options if you do not have enough space on your hard drive:
-
Delete unneeded files from your hard drive until enough space is available.
-
Note: While installing the discs, you will be prompted to delete previously saved ALLDATA Repair disc information. See Step 6 below for details.
-
-
Install additional memory on your computer.
-
Save the discs to an external hard drive.
-
Install only those discs that you use most frequently.
-
If you request information from a disc that is not saved to the hard drive, you will be prompted to install the disc.
-
-
-
-
Close all programs, including ALLDATA Repair.
-
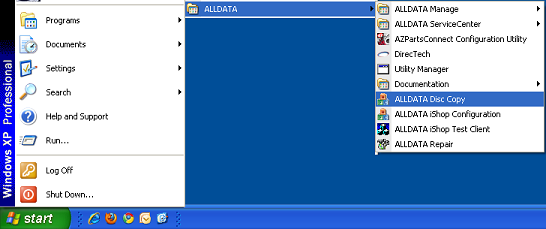
Open the Disc Copy Utility.
-
This is the program on your computer that allows you to copy the disc information to your hard drive.
-
Click Start >> Programs or All Programs >> ALLDATA >> ALLDATA Disc Copy.

-
-
The DiscCopy - Introduction screen opens.
-
Note: Most pages of the Disc Copy Utility show important information and/or instructions for how to use the program.
-
Each screen also includes a Help button, which opens detailed Help files.
-
-
Click Next.

-
-
DiscCopy - Step 1 of 6 - Select Data To Copy
-
Click Check All.
-
Scroll to the bottom of the list.
-
UNcheck the last three boxes: Service Advisor Disc1, Disc 2 and Disc 3.
-
If your computer has more than one DVD drive, make sure the correct drive is showing in the drop-down box.
-
Click Next.

-
-
DiscCopy - Step 2 of 6 - Remove Existing Data
-
If there were previous discs copied, they would show up here with check boxes.
-
Place a check next to each previous version so that the space is cleared up in your hard drive.
-
-
Whether you have boxes to check or not, click Next.

-
-
DiscCopy - Step 3 of 6 - Select Location Where Data Will Be Copied
-
Select the drive letter that you would like to copy the discs to.
-
Make sure that there is enough free disc space.
-
If not enough space is available, see the options listed in Step 1 above.
-
-
Click Next.

-
-
DiscCopy - Step 4 of 6 - Where Each Disc Will Be Copied To
-
A list displays showing which discs will be copied, and where they will be copied to.
-
If your hard drive does NOT have enough free space, the list shows which discs can NOT be copied.
-
-
Click Next

-
-
DiscCopy - Step 5 of 6 - Summary
-
The Summary displays which discs will be copied.
-
Discs that will NOT be copied due to lack of space are NOT listed.
-
-
Click Next

-
-
DiscCopy - Step 6 of 6 - Performing Requested Operations
-
If the first disc is already in the DVD drive, it will begin saving to the computer's hard drive.
-
If the first disc is NOT in the DVD drive, a message will appear asking you to place the disc in the drive.
-
Insert the disc >> Click OK.

-
-
When the disc has finished copying, you will be asked to remove that disc and insert the next disc.
-
Repeat this process until all the discs have been copied to your hard drive.
-
-
Click on Finish when all discs have been saved.
-


