Setting Up QuickBooks Desktop Export
IMPORTANT - QuickBooks Desktop Export feature has been deprecated.
Due to technological restraints and current level of support offered by Intuit, ALLDATA is able to offer limited navigation and usage support for this feature at this time. We unfortunately can no longer guarantee that QuickBooks Desktop Export will continue to function properly in the future.
We currently recommend using the Manage Online QuickBooks Online Integration feature with an online QuickBooks product in order to export your accounting information.
IMPORTANT - Create a backup of your QuickBooks company file before each import of ALLDATA Manage Online data.
- This ensures you always have a current saved copy of the company file to restore if necessary.
To export to QuickBooks Desktop Export, complete the following:
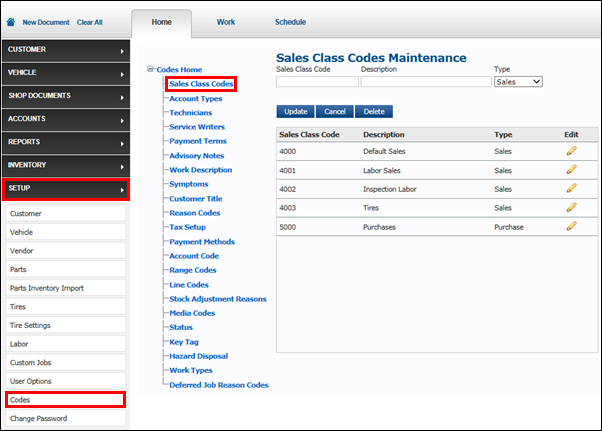
Create Sales Class Codes
In ALLDATA Manage Online
Sales Class Codes can be created and modified under Setup >> Codes >> Sales Class Codes Maintenance.
- It is not necessary to match your Sales Class Codes from Manage Online to QuickBooks because the export will create their own income accounts in QuickBooks.
- The account codes can consist of numbers and letters and have a maximum length of 8 characters.
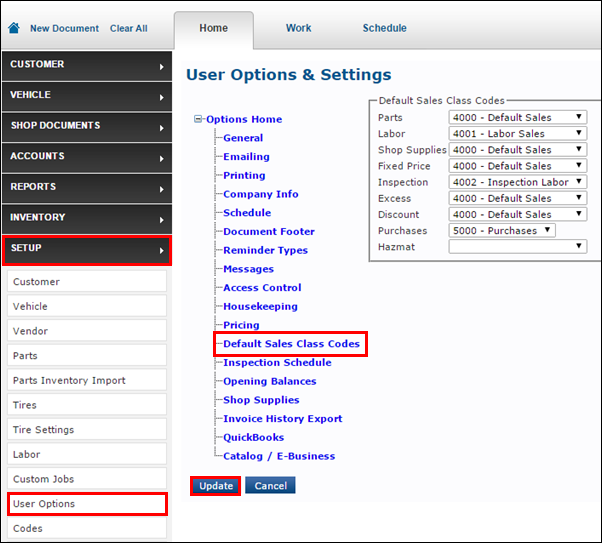
Once the Sales Class Codes have been added to ALLDATA Manage Online, the Default Sales Class Codes can be set under Setup >> User Options >> Default Sales Class Codes.
- This will assign the codes to the relevant transaction lines automatically, when creating an invoice.
- Note: Sales Class Codes can still be manually assigned to individual parts and labor items instead of using the defaults.
IMPORTANT - The images used in the instructions are examples.
- Consult your tax professional to confirm you are using the correct accounting information when exporting to QuickBooks Desktop.
In QuickBooks Desktop
Create new accounts, or note existing account names, for the following types of accounts:
- Accounts Receivable
- Payment Received
- State Taxes Payable
- Accounts Payable
- Note: These accounts will need to be entered into Manage Online when enabling QuickBooks Desktop Export.
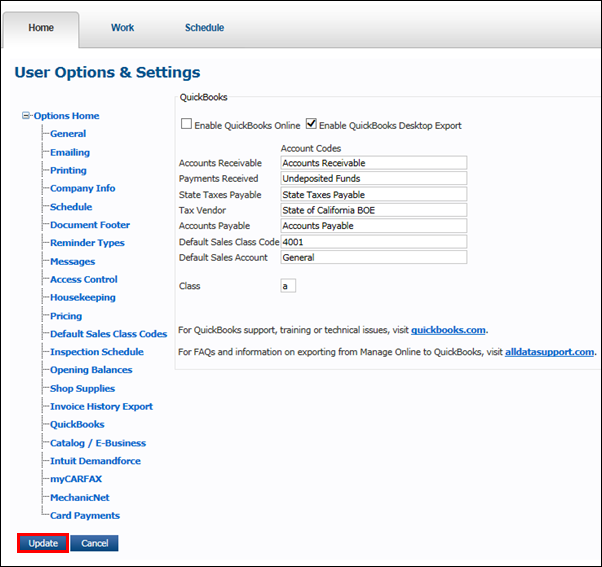
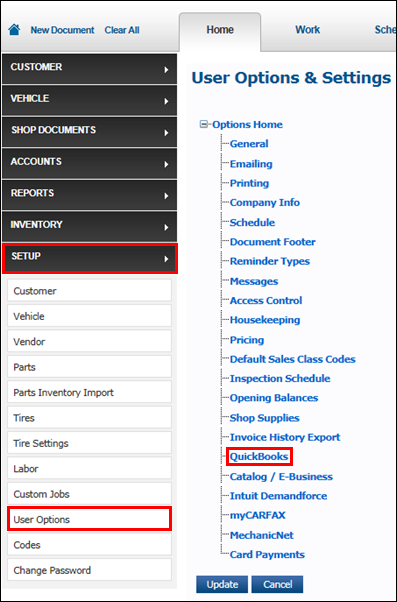
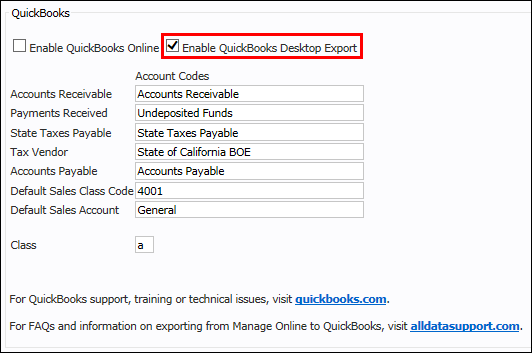
Enable QuickBooks Desktop Export
- Select Setup >> User Options >> QuickBooks.
Check the Enable QuickBooks Desktop Export box.
IMPORTANT - The images used in the instructions are examples.
- Consult your tax professional to confirm you are using the correct accounting information when exporting to QuickBooks.
Enter QuickBooks Desktop Export Account Codes
IMPORTANT - The images used in the instructions are examples.
- Consult your tax professional to confirm you are using the correct accounting information when exporting to QuickBooks.
- Input your QuickBooks Desktop Export Account Codes and Class.
- Note: The Accounts Receivable, Payment Received, State Taxes Payable & Accounts Payable account names must match your QuickBooks Desktop Company File.
- Note: If subaccounts have been used in QuickBooks, the main account and subaccount must be seperated by a colon when entering the information into ALLDATA Manage Online.
(Example: Taxes:State Taxes)
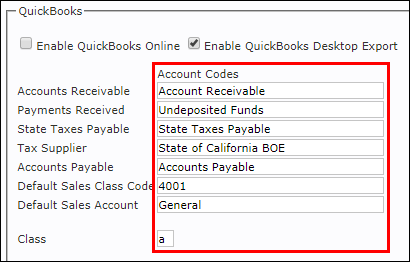
Accounts Receivable
Payments Received
State Taxes Payable
Tax Supplier
Accounts Payable
Default Sales Class Code
Default Sales Account
Class
|
- Confirm account codes and click Update.