Creating and Editing Custom Jobs
Custom Jobs are pre-built jobs that can be added to a work document with a single click.
Creating Custom Jobs
- If you haven't already, add parts into your inventory and create line codes.
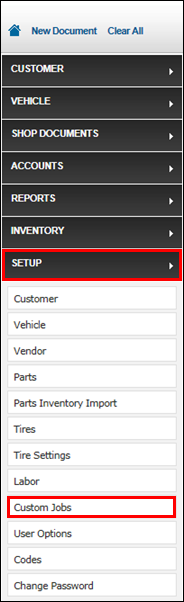
- Click Setup >> Custom Jobs.
- Enter a Job Name >> Description >> select a Sales Class Code.
- Entering a Job Name and clicking Find will search for an existing job with that name.
- Note: The Description will appear on the customer's invoice.

- Select one of the following Price Types:
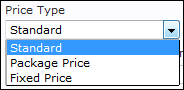
Standard
Creating a Standard Price Job:
- Complete the job specific options below:

- Category: This job will appear under the assigned category when making selections from the Custom Job selection screen.
- Note: Jobs that do not have a category assigned will appear in the Uncategorized section of the Custom Job selection screen.
- Use Customer Rate: Selecting Use Customer Rate will substitute the customer’s Default Labor Rate for the existing labor rate in the Custom Job.
- Active: Unchecking this box will remove the job from the Custom Jobs selection screen.
- Category: This job will appear under the assigned category when making selections from the Custom Job selection screen.
- Select a Type to start adding items
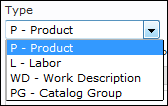
- P - Product: In Description, enter the part name (or % to search all parts) then click Search.
- If the part does not exist in your database, you can add a new part by:
- Entering a Line Code >> Code >> Description >> Qty.
- To change the prices of existing parts or to set prices for new parts:
- Check the Override Prices checkbox >> enter the appropriate pricing information in the Sell, Trade Price and Cost Price boxes .
- If the part does not exist in your database, you can add a new part by:
- L - Labor: Click Search to select an existing labor rate, then enter the labor hours into the Qty box.
- WD - Work Description: Click Search to select a pre-built Work Description.
PG - Catalog Group: Add Catalog Groups to save time when searching integrated electronic parts catalogs (see details below).
Optional: How to build PG - Catalog Groups
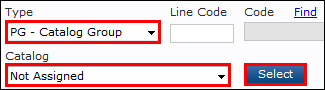
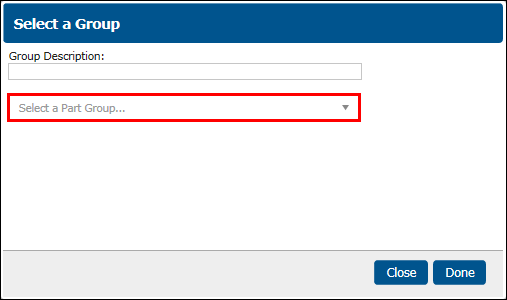
- Select PG - Catalog Group >> the integrated Catalog >> click Select.
- Click Select a Part Group and make a selection >> enter a Group Description (name of the Product Group) (optional).
- Notes:
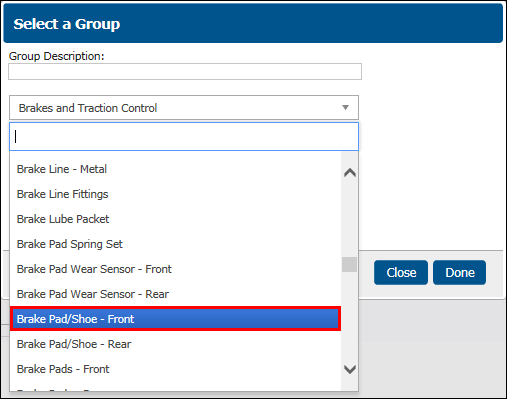
- Example Part Group: Brakes and Traction Control
- If no Group Description is entered, the first Part Group selected will autofill as the Group Description.
- Notes:
- Select all specific Part Groups related to the desired part.
- Example: Brake Pad/Shoe - Front
- Note: Type keywords to filter results, then click to add.
- Example: Brake Pad/Shoe - Front
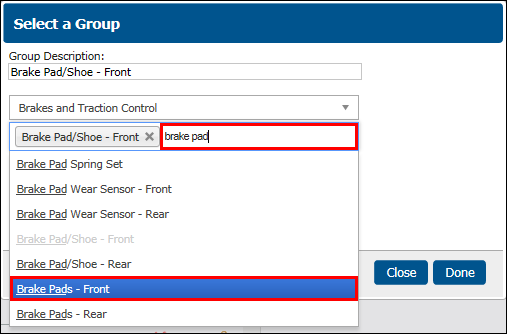
- Click the Part Group field to add all Part Groups that may include the item.
- Example: If you are creating a PG - Catalog Group for Front Brake Pads, add all items similar to Front Brake Pads, such as: Brake Pad/Shoe - Front, Brake Pads - Front, New Brake Pads Front and Performance Brake Pads.
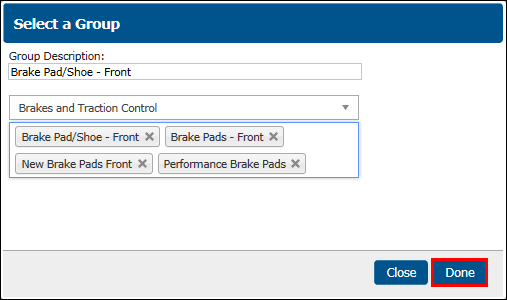
- Your selection will look similar to this example >> click Done.
- The PG - Catalog Group has been added to the Custom Job.
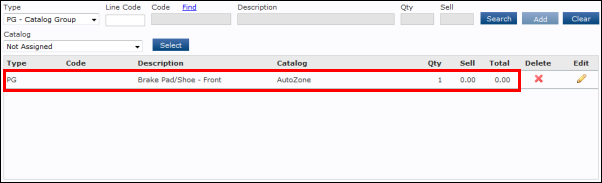
- Note: When a Custom Job with a PG - Catalog Group is added to the work document, the electronic catalog will automatically open, with links to the desired parts under "Pick List."
- Available Catalogs to use: OEM, AutoZone and Transtar.
- Select PG - Catalog Group >> the integrated Catalog >> click Select.
- P - Product: In Description, enter the part name (or % to search all parts) then click Search.
- Click Add when you have entered in all the necessary information for the item.
- Repeat this process until the job is complete.
- Click Update.
Package Price
Select Package Price if the custom job will be sold at a predetermined price, but you want to account for part pricing.
- Package Price is often used to create loss-leader jobs.
- Job total displays the customer price as the Sell price of the parts with an adjusted labor rate to meet the Sell price set for the job.
- If the part pricing exceeds the Sell price set for the job, the job total will increase accordingly.
Creating a Package Price Job:
- Complete the job specific options below:

- Category: This job will appear under the assigned category when making selections from the Custom Job selection screen.
- Note: Jobs that do not have a category assigned will appear in the Uncategorized section of the Custom Job selection screen.
- Sell - Set a minimum price that you would like to sell this job for.
- As parts are added, the labor rate will automatically be adjusted to meet this total.
- If part prices exceed the sell price, the job total will increase above the minimum.
- Use Customer Rate: Selecting Use Customer Rate will substitute the customer’s Default Labor Rate for the existing labor rate in the Custom Job.
- Active: Unchecking this box will remove the job from the Custom Jobs selection screen.
- Category: This job will appear under the assigned category when making selections from the Custom Job selection screen.
- Select a Type to start adding items
- P - Product: In Description, enter the part name (or % to search all parts) then click Search.
- If the part does not exist in your database, you can add a new part by:
- Entering a Line Code >> Code >> Description >> Qty.
- To change the prices of existing parts or to set prices for new parts:
- Check the Override Prices checkbox >> enter the appropriate pricing information into the Sell, Trade Price and Cost Price boxes
- If the part does not exist in your database, you can add a new part by:
- L - Labor: Click Search to select an existing labor rate, then enter the labor hours into the Qty box.
- WD - Work Description: Click Search to select a pre-built Work Description.
PG - Catalog Group: Add Catalog Groups to save time when searching integrated electronic parts catalogs (see details below).
- Note: When a Custom Job with a PG - Catalog Group is added to the work document, the electronic catalog will automatically open, with links to the desired parts under "Pick List."
- Available Catalogs to use: OEM, AutoZone and Transtar.
Optional: How to build PG - Catalog Groups
- Select PG - Catalog Group >> the integrated Catalog >> click Select.
- Click Select a Part Group and make a selection >> enter a Group Description (name of the Product Group) (optional).
- Notes:
- Example Part Group: Brakes and Traction Control
- If no Group Description is entered, the first Part Group selected will autofill as the Group Description.
- Notes:
- Select all specific Part Groups related to the desired part.
- Example: Brake Pad/Shoe - Front
- Note: Type keywords to filter results, then click to add.
- Example: Brake Pad/Shoe - Front
- Click the Part Group field to add all Part Groups that may include the item.
- Example: If you are creating a PG - Catalog Group for Front Brake Pads, add all items similar to Front Brake Pads, such as: Brake Pad/Shoe - Front, Brake Pads - Front, New Brake Pads Front and Performance Brake Pads.
- Your selection will look similar to this example >> click Done.
- The PG - Catalog Group has been added to the Custom Job.
- Note: When a Custom Job with a PG - Catalog Group is added to the work document, the electronic catalog will automatically open, with links to the desired parts under "Pick List."
- P - Product: In Description, enter the part name (or % to search all parts) then click Search.
- Click Add when you have entered in all the necessary information for the item.
- Repeat this process until the job is complete.
- Note: Job Total displays the customer price as the Sell price of the parts with an adjusted labor rate to meet the Sell price set for the Job.
- Click Update.
Fixed Price
Select Fixed Price if the custom job will be sold at a predetermined price, regardless of actual part and labor pricing.
Creating a Fixed Price Job:
- Complete the job specific options below:

- Category: This job will appear under the assigned category when making selections from the Custom Job selection screen.
- Note: Jobs that do not have a category assigned will appear in the Uncategorized section of the Custom Job selection screen.
- Tax Code: The selected tax code will apply to the entire job.
- Cost: Cost for this job.
- Sell: Set the price that this job will sell for.
- Use Customer Rate: Selecting Use Customer Rate will substitute the customer’s Default Labor Rate for the existing labor rate in the Custom Job.
- Active: Unchecking this box will remove the job from the Custom Jobs selection screen.
- Category: This job will appear under the assigned category when making selections from the Custom Job selection screen.
- Select a Type to start adding items
- P - Product: In Description, enter the part name (or % to search all parts) then click Search.
- If the part does not exist in your database, you can add a new part by:
- Entering a Line Code >> Code >> Description >> Qty.
- If the part does not exist in your database, you can add a new part by:
- L - Labor: Click Search to select an existing labor rate, then enter the labor hours into the Qty box.
- WD - Work Description: Click Search to select a pre-built Work Description.
PG - Catalog Group: Add Catalog Groups to save time when searching integrated electronic parts catalogs. (see details below).
- Note: When a Custom Job with a PG - Catalog Group is added to the work document, the electronic catalog will automatically open, with links to the desired parts under "Pick List."
- Available Catalogs to use: OEM, AutoZone and Transtar.
Optional: How to build PG - Catalog Groups
- Select PG - Catalog Group >> the integrated Catalog >> click Select.
- Click Select a Part Group and make a selection >> enter a Group Description (name of the Product Group) (optional).
- Notes:
- Example Part Group: Brakes and Traction Control
- If no Group Description is entered, the first Part Group selected will autofill as the Group Description.
- Notes:
- Select all specific Part Groups related to the desired part.
- Example: Brake Pad/Shoe - Front
- Note: Type keywords to filter results, then click to add.
- Example: Brake Pad/Shoe - Front
- Click the Part Group field to add all Part Groups that may include the item.
- Example: If you are creating a PG - Catalog Group for Front Brake Pads, add all items similar to Front Brake Pads, such as: Brake Pad/Shoe - Front, Brake Pads - Front, New Brake Pads Front and Performance Brake Pads.
- Your selection will look similar to this example >> click Done.
- The PG - Catalog Group has been added to the Custom Job.
- Note: When a Custom Job with a PG - Catalog Group is added to the work document, the electronic catalog will automatically open, with links to the desired parts under "Pick List."
- P - Product: In Description, enter the part name (or % to search all parts) then click Search.
- Click Add when you have entered in all the necessary information for the item.
- Repeat this process until the job is complete.
- Click Update.
Complete Price
Select Complete Price if the custom job will be sold at a predetermined price, regardless of actual part and labor pricing. Part and labor prices are automatically adjusted in order to accurately account for taxes.
Creating a Complete Price Job:
- Complete the job specific options below:
- Category: This job will appear under the assigned category when making selections from the Custom Job selection screen.
- Note: Jobs that do not have a category assigned will appear in the Uncategorized section of the Custom Job selection screen.
- Sell: Set the price that this job will sell for.
- Use Customer Rate: Selecting Use Customer Rate will substitute the customer’s Default Labor Rate for the existing labor rate in the Custom Job.
- Active: Unchecking this box will remove the job from the Custom Jobs selection screen.
- Category: This job will appear under the assigned category when making selections from the Custom Job selection screen.
- Select a Type to start adding items
- P - Product: In Description, enter the part name (or % to search all parts) then click Search.
- If the part does not exist in your database, you can add a new part by:
- Entering a Line Code >> Code >> Description >> Qty.
- If the part does not exist in your database, you can add a new part by:
- L - Labor: Click Search to select an existing labor rate, then enter the labor hours into the Qty box.
- WD - Work Description: Click Search to select a pre-built Work Description.
PG - Catalog Group: Add Catalog Groups to save time when searching integrated electronic parts catalogs. (see details below).
Optional: How to build PG - Catalog Groups
- Select PG - Catalog Group >> the integrated Catalog >> click Select.
- Click Select a Part Group and make a selection >> enter a Group Description (name of the Product Group) (optional).
- Notes:
- Example Part Group: Brakes and Traction Control
- If no Group Description is entered, the first Part Group selected will autofill as the Group Description.
- Notes:
- Select all specific Part Groups related to the desired part.
- Example: Brake Pad/Shoe - Front
- Note: Type keywords to filter results, then click to add.
- Example: Brake Pad/Shoe - Front
- Click the Part Group field to add all Part Groups that may include the item.
- Example: If you are creating a PG - Catalog Group for Front Brake Pads, add all items similar to Front Brake Pads, such as: Brake Pad/Shoe - Front, Brake Pads - Front, New Brake Pads Front and Performance Brake Pads.
- Your selection will look similar to this example >> click Done.
- The PG - Catalog Group has been added to the Custom Job.
- Note: When a Custom Job with a PG - Catalog Group is added to the work document, the electronic catalog will automatically open, with links to the desired parts under "Pick List."
- Available Catalogs to use: OEM, AutoZone and Transtar.
- Select PG - Catalog Group >> the integrated Catalog >> click Select.
- P - Product: In Description, enter the part name (or % to search all parts) then click Search.
- Click Add when you have entered in all the necessary information for the item.
- Repeat this process until the job is complete.
- Notes:
- The Job Total displays the customer price as the Sell price.
- The Parts and Labor lines display as their regular sell prices.
- Hidden adjustment lines are created to properly calculate tax for each associated PTT (Product Tax Type) and to meet the Sell price set for the Job.
- Notes:
- Click Update.
Editing Custom Jobs
- Click the pencil icon for the job that is going to be edited.

- The selected job will display.
- Edit the job:
- Make changes to the job options.
- Add additional items by following the steps in the Creating Custom Jobs section above.
- Edit or delete line items by clicking the Edit (pencil) or Delete (red x) next to the item.
- Click Update.